Here’s my version of the ‘nuclear method’ for authors, aka How To Nuke A Document Without Losing Italics (or other special fonts).
Okay, to be more accurate, italics and other special fonts do get blasted with the rest of the potential bugaboos. But this tutorial shows you how to prepare special fonts for the blast and restore them in a few simple steps afterward.
Have faith. We’ll get through this, I promise.
PART I: Intro
WHY BOTHER WITH THIS?
If you look really close at the image below, you’ll see why.
Don’t get me wrong. I love Microsoft Word™. I couldn’t do my jobs without it, but the program does bury tons of crap in .doc and .docx files. These invisible landmines can lead to file corruption. The mess can also cause files to fail Smashwords’s AutoVetter and MeatGrinder.
Over the years I’ve simply come to accept that if I take advantage of Word™’s many benefits, nuking files is the price I pay. Hundreds of files later, I’ve streamlined my nuking method down to an efficient science.

HOW DOES NUKING WORK?
The nuke itself is a simple three-step process:
- Copy the entire file.
- Paste the file into a plain-text editor.
- Copy the plain text version back into a fresh Microsoft Word™ file.
The oh-so-dramatic “Nuclear Method” name comes from the devastating toll this process takes on a document’s coding. Precious few ones and zeroes survive the trip into the plain-text editor. Text characters (letters, numbers, basic symbols and punctuation), spaces, paragraph returns and list tags are the only survivors. Absolutely everything else is lost in the blast, including images, hyperlinks, footnotes, tables, text-boxes, table-of-contents links and colored and special fonts, along with all that bloated code that’s piled up over multiple saves and file-rewrites.
Right now, authors might be picturing a baby sailing out the window on a wave of its own bathwater, and that visual is sadly accurate; Much of the good is lost with the bad.
But don’t worry; I’m lazy, and I know how to minimize the restoration work.
PART II: Process Overview
Here’s what we’re about to do:
- Prep work
- The Nuke
- Reconstructive work
Prep Work: A lot of the reconstructive work is actually done at this stage. Be prepared for this step to take much longer than any other, and probably longer than anticipated.
The Nuke: Short and sweet. Who doesn’t love to blow stuff up?
Reconstructive Work: The guide only covers the necessities, and adheres strictly to Smashwords Style Guide. Beware that further esthetic formatting changes made to a file can reintroduce the problems that caused the trouble in the first place.
HERE’S WHAT YOU NEED
- Microsoft Word™, obviously. You wouldn’t have all these troubles without it, bless its glorious but black heart.
- A plain text editor (see below)
PC: Plain-text editor for Windows users: Notepad (not Wordpad). Notepad can be found in Start/All Programs/Accessories on most Windows systems. Do not use Wordpad. Wordpad is a rich-text editor. It will not annihilate all of Word’s hidden junk.
MAC: Plain-text editor for Mac users: TextEdit set to ‘plain text’ (not rich text). TextEdit can be downloaded for free from many different sources. Make sure the editor is set for plain text only, not rich text. The rich text setting will not annihilate all of Word’s hidden junk.
DISCLAIMER AND SANITY TIPS:
This guide assumes the user is not a complete Microsoft Word™ novice. Restoration without a preset document template and styles might require expert help (and/or tequila).
This guide also assumes the user has either tried to pass Smashword’s AutoVetter but failed, or found nasty formatting in a file compiled by MeatGrinder.
If the last bit applies to you, chances are this independent publishing gig already has the reader frustrated. Be warned it could get worse before it gets better. Nuking is not easy or intuitive the first time. Plan to read through the entire guide at least once before trying anything. Then schedule extra time to go slowly, taking frequent breaks to listen to music, go out for a run or kill orcs. Whatever numbs the stress.
TUTORIAL TIPS:
Many keyboard shortcuts are suggested. They will often appear like this: (ctrl+i or cmd+i) or (ctrl+i/cmd+i) The first is the Windows shortcut. Second is the Mac shortcut.
And no matter what, always remember the most important keyboard shortcut of all: ‘Undo’. (ctrl+z or cmd+z) That lovely little command is a nuker’s best friend.
Finally, for clarity’s sake, please use the guide’s suggested file names until nuking becomes old hat. The process involves at least four different files. Improvisation could make things unnecessarily confusing the first time out.
PART III: Prep Work
STEP ONE
Open the file (.doc or .docx) to be nuked.
STEP TWO
Create a working copy using the file menu option ‘Save As’.
‘Save As’ creates a copy of the original file, leaving the original intact, just in case. While in the ‘Save As’ pane, name the clone prep_title (substituting the work’s title for Title).
Example:
Original File: Title.doc
The ‘SaveAs’ Copy: prep_title.doc
IMPORTANT: Continue working in the prep_title.doc version. Do not re-open the original file.
STEP THREE
Take no prisoners.
All ebook content should be nuked. If not already present in the file, the copyright page, dedication, acknowledgements, table of contents (if applicable) and etc. should be added to the front of the file. Add the ‘about the author’ and any other promotional material like excerpts to the end of the file.
!!! Plain-old save the file before continuing.
STEP FOUR
Get rid of tables and text boxes.
eBooks must not contain tables or text boxes. Most ereader devices and aps cannot display these items.
If tables or text boxes must be used, convert them to images. This is done with screen capture and image-editing software that can crop images.
How? Here’s the quick-and-dirty method:
- Position the table or text box so it is visible on the screen.
- Screen capture. (Windows users: press Ctrl + ‘Print Screen’ key. Mac users: press Cmd + Ctrl + Shft + 3).
- Open the image editing software.
- Paste (ctrl+V or cmd+V) the screen capture into a new, empty file.
- Crop the image. (Interior images should not be wider than 350px)
- Save the cropped image. (preferably with a coherent filename)
For now, don’t bother substituting the image in for the table or textbox. Put a production slug (placeholder text) in its place like ##table1 or ##textbox1.
What’s important about a production slug is that it has an easy character-string to ‘find’ with a word-processor’s Find function. I always use pound signs, but users can use just whatever makes their little indy hearts go pitter-pat.
!!! If changes were made to the file, save the file before continuing.
STEP FIVE
Get rid of all continuous character strings longer than 50 characters.
If creative license caused many words to be crammed together into extra-long character strings, break them up now. Long strings + small screens = big trouble.
!!! If changes were made to the file, save before continuing.
STEP SIX
Index perishable items.
During the nuking process, all hyperlinks, images, bookmarks, footnotes and table-of-contents links will be lost. They are not plain text. Therefore, they will not survive their trip into the plain text editor.
For clarity’s sake, let’s call these perishable items “properties”. To save hours of reconstructive surgery later, create an index of each perishable property in the file.
How? Here’s the not-so-quick-or-dirty method:
- In the spreadsheet program of your choice, list each property (or production slug) in the order they appear in the file. View an example. (The example does not include Table of Contents placeholders. This guide’s author didn’t want to make anyone cry this early in the process)
- Assign each property a placeholder tag, ie. <PH001>
- List each property’s particulars, like an image’s file name, a hyperlink’s http://stuff.com, or the footnote’s notation.
- Save the index file as index_title
- Place placeholder tags in the prep_title file either next to or in place of their respective properties.
Later, when it comes time to restore all properties, each property’s correct locations are easily found by searching the placeholder tag with Word™’s Find utility.
!!! Save the prep_title file before continuing.
STEP SEVEN
Partitions
Partitions, for our purposes, mean book sections like parts or chapters.
“Sections”, as in the kind Word™ allows for fancy page-numbering and heading/footer tricks, serve no purpose in ebooks other than to increase the chance of conversion failure.
Pagebreaks don’t survive the nuke. Their debris will be removed during the prep phase, and manually re-added after the nuke.
A note about Smashwords and Partitions:
The safest partition marker for Smashword’s MeatGrinder is heading style, like a larger font and centering, along with judicious word choice. Slightly larger (14pt) centered font will always look good in every format.
Keep titling simple, like “part” or “chapter”. Remember that these partition headers will become navigational markers in EPUB and MOBI. If they’re very long, the Table of Contents will look like shit, and confuse readers.
Put some thought into partitions, and how they can be optimized for MeatGrinder’s EPUB and MOBI versions. Is there a happy medium to be found between PDF’s prettiness and EPUB/MOBI’s functionality?
Whatever the case, be consistent and be accurate. Decide on a sensible partition style, then double-check the accuracy of any lettering or numbering before continuing.
!!! If any changes were made to prep_title, save the file before continuing.
STEP EIGHT
Deal with bullet lists and outlines.
Simple (single level) bullet lists will survive the trip into the text editor. Simple numbered lists (outlines) will not survive intact.
The trouble concerns indentation. “Nested items”, or those items requiring more than one indent in a traditional outline layout, will only indent once. This can cause reader confusion.
See this page for an example of trouble with lists:
https://sites.google.com/site/epubandmobis/editorial-concerns#list
Right now, there is no known way to preserve nested lists in any ebook format, nor a quick fix to re-nest them later. These will have to be fixed by hand after the blast.
At this stage, users with nested lists have three choices:
- Revise the lists to contain only one level of indent, and accept there will be display errors in certain file types.
- Revise the lists using regular text markers instead of bullets or indents
- Revise the lists out completely.
Make a choice and go with it.
!!! If any changes were made to the file during this step, save the file before continuing.
STEP NINE
Double-Check For Blank Lines.
Blank lines are hit-or-miss on ereader devices. Some devices are even programmed not to display blank lines in order to maximize the amount of text-on-screen per screen refresh.
Blank lines must not be relied upon to cue readers to a chapter, page or scene break. Page and chapter breaks will be dealt with later. The focus of this step is any instance where a blank line has been used to cue a scene break or change in narrative point of view. Insert ‘break characters’ instead.
The Smashwords’s Style Guide recommends the following break characters: * * * * (four asterisks with a space between each one)
Insert break characters wherever needed.
!!! Save the file before continuing.
STEP TEN
Housekeeping
This next section might feel a bit like cleaning a house before blowing it up, but the effort will yield a much better product.
The cleanup is done using Word™’s Find/Replace (ctrl+h/cmd+h) utility, and the effect of some of these replaces could be quite alarming, like the removal of tabs. Don’t worry. All will come right in the end.
Users can turn on formatting marks…or not. The same results are achieved with or without formatting characters visible.
NOTE:
These instructions are tailored to Word users. This can also be done with Open Office and any number of other free, open-source word processors. To reproduce these results, make with the Google machine. The information is definitely out there, because writers are the most helpful people in the world.
Run the following Find/Replaces, in the order listed.
Go here for a fully illustrated version of these steps.
Find/Replace 1
Spaces
This step eliminates all extra spaces in a file.
Find: [space][space](left-click in the Find field, then hit the spacebar twice)
Replace: [space](left-click in the Replace field, then hit the spacebar once)
Perform “Replace All” repeatedly until Word returns a zero result.
When finished, delete the spaces from the Find and Replace fields.
!!! Save the file before continuing.
!!! Save after each of the following find/replaces. Don’t skip any, or you will be sorry.
Find/Replace 2
Tabs
This step eliminates all tabs in a file. Word™’s formatting shorthand symbols are used instead of futzing around with the F/R pane’s pull-down menus.
Find: ^t (shift+6 followed by a lowercase T)
Replace: (make sure this field is empty of anything)
Perform “Replace All”. One click should do it.
When finished, delete ^t from the Find field.
Find/Replace 3
Manual Line Breaks
This step eliminates all manual line breaks. Yes, the writer of the guide can hear the screaming and crying from authors who have intentionally used these. Unfortunately, the only way to eliminate the unintentional is to murderize them all.
Find: ^l (shift+6 followed by a lowercase L)
Replace: (make sure this field is empty of anything)
Perform “Replace All”. One click is enough.
When finished, delete ^l from the Find field.
!!! Save the file before continuing.
Find/Replace 4
Page Breaks
This step eliminates all user-inserted page breaks in a file, and prevents a cockroach from surviving the nuclear blast (Word’s garbage pagebreak character).
Find: ^m (shift+6 followed by a lowercase M)
Replace: (make sure this field is empty of anything)
Perform “Replace All” once.
When finished, delete ^m from the Find field.
Find/Replace 5
Word’s Dirty Little Habits
This step gets rid of the unnecessary space Word likes to randomly insert before paragraph marks.
Find: [space]^p (hit the spacebar once, followed by shift+6, followed by a lowercase P)
Replace: ^p (shift+6 followed by a lowercase P)
Perform “Replace All” until Find/Replace returns a zero result.
When finished, delete everything from the Find field.
Find/Replace 6
Extra Spaces Before Paragraphs
This step eliminates any extra spaces before the start of any paragraph.
Find ^p[space] (shift+6 followed by a lowercase P, followed by one space)
Replace ^p (shift+6 followed by a lowercase P)
Continue to click “Replace All” until Word returns a zero result.
When finished, delete everything from both the Find and Replace fields.
Find/Replace 7
Double Quotation Marks
This step uses a common cheat to ensure all double quotation marks are coded identically.
Find: “ (shift+quotation mark key)
Replace: “ (shift+quotation mark key)
Perform “Replace All” once.
When finished, delete everything from both the Find and Replace fields.
Find/Replace 8 (OPTIONAL)
Extra Paragraph Marks
The Smashwords’s Style Guide mentions using four paragraph returns as a faux pagebreak.
It is mentioned… but not recommended.
To ensure uniformity across all display devices, this step will leave no more than two sequential paragraph returns in a file.
Find ^p^p^p (shift+6 followed by a lowercase P; repeat twice)
Replace ^p^p (shift+6 followed by a lowercase P; repeat)
Click Replace All, and continue clicking until Word kicks back a zero result.
Side note from guide author: I generally use ^p^p in the Find field, and ^p in Replace to get rid of every single extra paragraph return. This is not a recommended practice for nuking novices. Doing so makes it harder to find chapter headings during reconstruction.
!!! Save the file before continuing.
STEP 11
Special Fonts
More Find/Replace ahead, this time to bookmark special fonts. This saves hours upon hours of busy work during reconstruction.
These steps place impossible (unlikely to occur naturally) character strings around special fonts. Should any of the character strings actually appear in your file, use something else. The point of these strings is to make them easy to find after the nuke with Word’s Find feature.
In order to perform these steps, users must apply special fonts to the Find field. In most cases, application is as simple as clicking inside the field and pressing the regular special font keyboard shortcut, ie. ctrl+i/cmd+i or ctrl+b/cmd+b.
Certain laptop users have experienced issues with shortcut application, however, and should get to know the Find/Replace pane’s More>>/Font window. Selecting the desired special font in the Font style: field will apply the special font to the Find field.
The only exception is Strikethrough, which must be applied from the More>>/Font window. No reliable keyboard shortcut exists. Find the Strikethrough checkbox in the Effects section. To apply strikethrough to the Find field, left-click the checkbox next to Strikethrough.
!!! ALL USERS: Before beginning this process, take a moment to locate the ‘No Formatting’ button at the bottom of the Find/Replace pane. It will be used repeatedly. Click More>> if it isn’t visible.
The ‘^&’ used during the Find steps is more Word shorthand. If curious, visit Google.
Common sense: If the file to be nuked does not contain one or more of these special fonts, there is no need to add those bookmarks. Perform only the necessary F/R’s.
More common sense: Only three special fonts are listed here. These special fonts are the only ones known to reliably render on a majority of ereader devices. If a file contains special fonts not listed here, the author should resign themselves to doing without them.
Read more about special fonts and other e-book issues.
Even more common sense: Underline font is reserved for hyperlinks and (limited) notation. Applying underline for any other reason will confuse readers.
MARK SPECIAL FONTS:
Mark 1
Italics
This step bookmarks all italicized font.
Find: [font: Italic] (left-click inside Find field and apply italics via shortcut or More>>/Font)
Replace: iiii^&iiii(four i’s followed by shift+6 followed by shift+7, followed by four i’s)
Perform “Replace All” once.
When finished, left-click inside the Find field and remove the applied italics by pressing the ‘No Formatting’ button.
!!! Save the file before continuing.
Mark 2
Underline
This step bookmarks all underlined font.
FIRST:
- Remove italics from the find-field: Left-click inside the Find field and remove leftover formatting by clicking the ‘No Formatting’ button.
- Remove everything from the Replace field.
THEN:
Find: [font: Underline] (left-click inside Find field and apply underline via shortcut or More>>/Font)
Replace: uuuu^&uuuu
Perform “Replace All” once.
!!! Save the file before continuing.
Mark 3
Strikethrough
This step bookmarks all strikethrough font.
FIRST:
- Remove italics from the find-field: Left-click inside the Find field and remove leftover formatting by clicking the ‘No Formatting’ button.
- Remove everything from the Replace field.
THEN:
Find: [font: Strikethrough] (left-click inside Find field and apply underline via More>>/Font)
Replace: ssss^&ssss
Perform “Replace All” once.
!!! Save the file before continuing.
PART IV: Bombs Away
First, make sure the prep_title file has been saved. Then double-check again.
Triple-check before continuing.
Before going any further, take a moment to visualize what’s about to happen:
- Copy the entire prep_title file onto Clipboard.
- Paste the entire prep_title file into a plain text editor.
- Copy and paste the plain text editor version back into a fresh Word™ document.
Three simple actions. Three different files.
Follow the steps in this section exactly. Do not attempt any other method of placing the prep_ file’s contents into the plain text editor. Opening the prep_ file inside the plain text editor, or using explorer’s ‘Open With’ will not produce the same result as simply pasting the file’s contents into the plain text editor.
In other words, please don’t get creative. It won’t help or simplify anything.
Ready? Okay.
STEP ONE
Select and Copy
This step copies prep_title onto Clipboard.
- In the Word version of the prep_title file, left-click anywhere.
- Select the entire file via keyboard shortcut (ctrl+a/cmd+a) or Edit Menu/Select All. (Word 2007 users have an edit pane on the Home ribbon. Click the down-arrow next to Select and select ‘Select All’.) This step will highlight the entire file.
- Copy the entire file via keyboard shortcut (ctrl+c/cmd+c) or Edit Menu/Copy. (Windows 2007 users should right-click anywhere in the file and select Copy)
STEP TWO
Create plain text version
- Open the plain text editor.
- If the text editor does not automatically open a new file, open one now.
- Left-click anywhere inside the new plain text editor file.
- Paste the Clipboard contents via keyboard shortcut (ctrl+v/cmd+v) or right-click and select ‘Paste’.
TROUBLE???
If nothing pasted into the plain text editor, back up a few steps. One of the following got missed:
- Select All
- Copy
- Left-click in the plain text editor
- Paste
Start over and try again.
SUCCESS???
Awesome.
- Save the plain text editor version of the file as text_title.doc before continuing.
- Close prep_title before continuing.
STEP THREE
Copy plain text version to Clipboard
Free pron! Free beer! Free chocolate! World of Warcraft!
Do I have your attention yet?
Good, because this is the step that causes the most trouble.
One click can make the difference between success and nuclear meltdown: BE SURE to left-click inside the plain text editor text_title version before copying to clipboard. The most common problem is that users fail to copy the plain text version onto their clipboard. This leaves those poor unfortunate souls with the crappy old prep_title version on their clipboard instead, and this always ends badly.
So please, before moving forward, make sure to left-click anywhere inside text_title. The cursor should be blinking somewhere inside text_title.
Once the cursor blinks somewhere inside text_title:
- ‘Select All’ via keyboard shortcut (ctrl+a/cmd+a) or Edit Menu/’Select All’.
- Copy the entire text_title file via keyboard shortcut (ctrl+c/cmd+c) or right-click/‘Copy’. (If using only keyboard commands, copy via Edit Menu/Copy.)
Now the plain text version should be safely parked on Clipboard.
STEP FOUR
Create a new, fresh Word™ version
- Head back into Microsoft Word and open a new blank document.
- The guide assumes users have either a prepared document template or knowledge of Word’s Styles feature to help control this new blank document. Either way, to begin the reconstructive process, the plain text version (‘text_title’) must be dropped into the new Word document.
- Paste the text into the new Word document by right-clicking anywhere in the fresh Word document and selecting ‘Paste’. (Or left-click inside new Word document, then ctrl+v/cmd+v)
TROUBLE???
If nothing pasted into the new Word version, go back and re-read == STEP 3 == again. Then select and copy the plain text text_title version this time.
If something successfully pastes into the new Word version but a) looks funny, b) lands in a weird font or c) still contains special fonts, here are some likely fixes:
- Windows users: Use Notepad, not Wordpad. Wordpad is not a plain text editor.
- Mac users: Make sure the text editor is set for plain text only. Rich text settings will not produce the same results.
- Back up and be sure to copy the plain text text_title version onto Clipboard this time.
SUCCESS???
Outstanding, Grasshoppa.
Once the text_ version has been successfully received into the new Word™ version, Save the new Word™ version as clean_title.
PART V: Reconstruction
Now we restore the stuff we prepped earlier.
STEP ONE
Restore special fonts
For each special font type bookmarked before the nuke, users must run a Find/Replace to restore the fonts. Each time, substitute the appropriate string of ‘impossible’ characters in the process outlined below.
!!! These F/R’s should be performed in the new clean_title file, not the old prep_title file.
This step will restore the bookmarked special fonts in the new file, exactly as they appeared in the original.
The (*) in the middle of the impossible strings is more Word shorthand. If curious, visit Google.
ATTENTION:
The \1 is also Word shorthand. It is a forward slash (not a backslash) followed by the numeral one. Use the slash above the enter key, not the one below.
- Open the Find/Replace window, and click the More>> button if the entire pane isn’t already showing.
- Place a checkmark in the ‘Use Wildcards’ checkbox.
- In the Find field, clear out whatever’s there and type: iiii(*)iiii ( or ssss(*)ssss or uuuu(*)uuuu bbbb(*)bbbb as needed)
- In the Replace field, type: \1 (forward-slash, one)
- Apply each special font to the Replace field via keyboard shortcut or More>>/Font
- Click Replace All
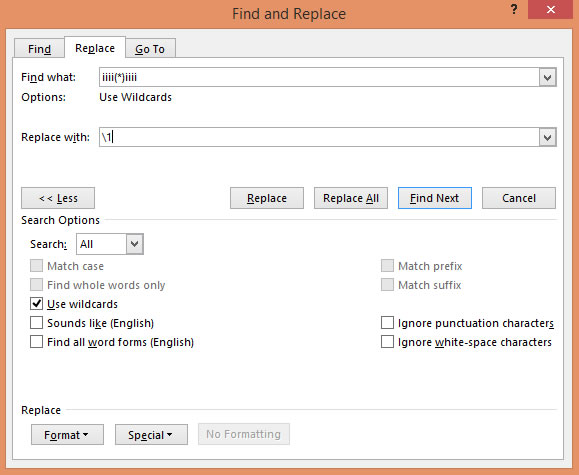
!!! Save the file after each Find/Replace.
!!! Clear both the Find and Replace fields of contents and formatting between each step. Formatting is un-applied to F/R fields with the ‘No Formatting’ button.
!!! Uncheck the ‘Use Wildcards’ checkbox before continuing.
STEP TWO
Restore properties
Open the index_title spreadsheet.
Use Word’s Find feature (ctrl+f/cmd+f) to find each placeholder in the file.
Restore each property as needed. Refer to the Smashwords Style Guide for help with Table of Contents bookmarks and image handling.
STEP THREE
Restore partitions
Find each partition heading and restore the styling.
STEP FOUR
Celebrate!
That’s right, folks. The nuclear winter, for all intents and purposes, has passed, and all the vital restoration work is done.
Remember that any further bells and whistles may increase the chance for file corruption, or re-introduce the poison pill(s) that made the file fail in the first place.
Good luck, and Godspeed.